 |
||||
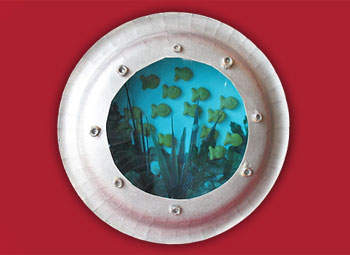
Crafts Paper Plate PortHole This project, adapted from the well known Paper Plate Aquarium, is a unique and fun way for kids to create their own world under the sea. If making this as a classroom project, line the wall with gray paper and line up your portholes for all to see. Be sure to explore all of our fun summer activities including great crafts for kids, summer printables, fabulous recipes, outdoor fun and more! What you'll need:
How to make it:
Tips:
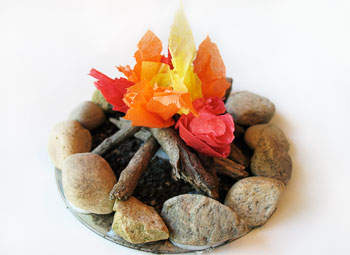
 CD CampFire Recycle an old CD and make this fabulous miniature campfire! This makes a perfect gift for campers who love roasting marshmallows in the great outdoors. Check out our other pages for more great summer crafts and camp crafts. What you'll need:
How to make it:
Tips:
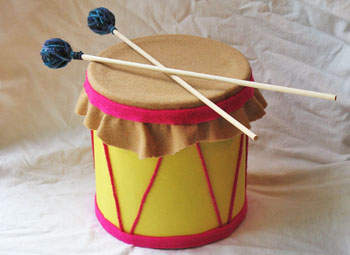
 Coffee Can Drum Kids love music and banging on pots, pans, and plastic containers. Combine their creativity with their musical talent by making this adorable homemade drum. For more great crafts and activities for kids, check out our Camp Crafts, Summer Crafts, and Classic Kids' Crafts. What you'll need:
How to make it:
Tips:
 |
Game Of The Week Hunting For Sheep Get 6 players to hold hands and form a circle. Then get one player to stand in side the circle. That player is the Sheep. 1 player stands outside the circle. That player is the Wolf. The Wolf trys to get the Sheep. The 6 other player's jobs are to keep the Sheep safe. If The Wolf gets in side the circle the game is over. A new Wolf and Sheep is chosen. This game is better to be played outside.
Poor Sheep:(:(
Tolit Tag 4 or more ppl must play. 1 player must be tagger. All the other players run around. If u get Tagged you have to crouch down and hold out one hand. Someone that didnt get tagged yet must flush your hand for you to get untagged. After A While pick a new tagger or the last one that hasnt been tagged wins.
Knock Out(soccer style) set up a circle outside to play in 4 or more ppl must play. 1 person is the tagger. The tagger trys to kick everyones ball out of the circle. The other players can not stop dribbling around the circle. If your ball gets kicked outside of the circle your out and you must stand outside of the circle until the game is done. The las tone in the circle that hasnt had their ball kicked outside the circle wins. Everyone player must have a soccer ball including the tagger. Heads Up Seven Up Seven students
ORPlayed inside a classroom...everyone puts their heads down on their desks and extends one thumb. The teacher chooses one person as "It." He/she goes around touching the thumbs of six people. If your thumb is touched, you go to the front of the room. When this has been accomplished, "It" yells, "Seven up!" Everyone raises their heads and has to guess which of the seven people is "It." Ghost In The Graveyard This game is usually played inside, and the emphasis is more on hiding than chasing. The second and third variations are outdoor/night games First you gather up at least 3 or more people. Then you find a base. Next you choose 1 person to be it. That person will stand on the base and 1:00, 2:00, 3:00 and keeps doing that until you get to 12:00. All other players hide while "It" counts. On 12:00 yell out 'Midnight'. Then all the hiders try to run to the base before the person that is it catches you. Then if a person gets found then they are it. For "Hit the Door" the base must be a door and you must hit it to be safe. OROne person would be the ghost.
The rest of the group would stay on "base" and count " one o'clock, two o'clock, three o'clock, rock...'till you got to midnight (after every 3rd number say "rock"). Then go search for the ghost. Whoever found the ghost yelled "ghost in the graveyard" and all the seekers out make a mad dash back to base. Whoever was tagged was the next ghost. It is best to play when it is early evening or dark. ORIt MUST be played after dark, in the summer, preferably with some moonlight. One person is selected to be the witch. (We preferred to use big potatoes!) The witch hides while the rest of the group counts to 100. At that point, the group goes forth singing over and over again "The witch ain't out tonight! The witch ain't out tonight!". We always had certain areas, such as around our house or through a particular small field, that had agreed upon parameters. Not that we knew what parameters meant, mind you! Whenever the witch feels like it, he/she bursts from hiding and catches as many of the chanters as possible while the rest run screaming for home. Once all are sorted out, the caught people are also witches and hide as before, continuing on until only one person is left unwitched. That person becomes the witch in the next round. The game is played until all participants are tired of singsonging the chant or until the parents cruelly force happy children to come inside and bathe. OROne person goes to hide and we count like this, One o'clock, Two O'clock, Three O'clock...until we get to Midnight(yelling this really loud ) then the would be victims go an search reluctantly for the "bloody Four Square I spent many many hours playing this game in a little school called Roeper; except that it had six squares instead of four. It was not merely a game, it was an art form. In the standard game, there are four squares painted on the ground, all touching each other, making one, larger square. Each small square is roughly 8' x 8', but that's not a hard and fast rule. The ball used is the standard red 'kickball' Each player occupies one of the squares. The squares each have a rank order. The square with the highest rank is called the 'King' [Sometimes the 'Ace']. The other squares sometimes have names, and sometime don't. The #2 square may be called the 'Prime Minister', or the other three may be called the 'Queen', 'Prince', and 'Princess'. The start the game, the King serves the ball by bouncing it in his square once and then hitting it towards one of the other squares. The receiving player then hits the ball to any other player, and play continues until one of the following things occur: 1) A player hits the ball (or is hit BY the ball) before it bounces once in their square. 2) A player does not hit the ball before it bounces twice 3) A player hits the ball out of bounds (it must land in someone's square first) Once a player is 'dead', they move back to the lowest ranking square. The other players then move up to fill the vacancies. If there are more players than squares, that person goes to the back of the line, and the person at the front of the line gets to move onto the lowest square and play. Click here for some thoughts on how big the squares should be. Capture the Flag
There were two teams.
Team 1 had the front yard and Team 2 had the back yard, or a field was split between the two teams. The teams were given a time period, like 5 minutes, to hide their flag
[optional] During this period spies were sent out to see were the flag was hidden as well as look-outs to catch the spies.
When the flag was hidden you call out that you were finished. Then you simply try to get the other teams flag. If you get caught and tagged by the opponent on their territory you had to go to jail and could only be freed by a teammate who grabs you when your opponent isn't looking.
The first team to capture the flag wins. In most versions you had to both get the flag, and bring it back to your side.
This game is a totally different game at night in the woods
Sock Wrestling All the kids sit in a circle and have to take off their shoes so they are only wearing socks. Every kid is given a number. Two numbers are then called out. The kids with those numbers come into the center of the circle, and, remaining on their knees, must, in any way possible, get the other person's sock before they get theirs. Very funny to watch
Murder Things you'll need: At least 3 kids (ages 8 and up or that can stay still and understand the game.), a quarter, a flash light and a cloth to cover the flashlight. Rules: On person is chosen to be "it". The other players sit down and form a circle. In the middle of the circle is the flashlight covered by the cloth, make sure that all the players can see each others eyes. The person who is it shuts the lights, except for the flashlight and the other players close their eyes and put their hands behind their backs. "It" walks around the circle and places the quarter in an unsuspecting player's hand. The person who is it than says "OK, open your eyes." the players in the circle than open their eyes and the person with the quarter tries to kill the others bye blinking at them. If the other players get blinked at they fall to the ground. The players with out the quarter try to guess who the "killer" is. If they guess incorrectly or get blinked at they are out for this round. The game continues with the person that gets the quarter to be it. Contributed by Justine - Thank you! ORThis game is played by having everyone sit in a circle. All hold hands. The pre-selected murderer then starts to squeeze the hands of those sitting next to him/her. For each squeeze it will travel that many hands away from the murderer. The people next to the murderer squeeze the people next to them minus one time, and this continues until someone is squeezed only once. The person who receives only one squeeze is dead. The object of the game is to guess who the murderer is before you get "killed." Assassin This is a game best played in a large group. We always played it with the 6-10 year olds at our summer camp. Sit all of the children in a circle, with legs crossed. Have all children put their heads down. one person (we always had at least one adult present) would walk around the circle and tap one child on the head. This person was the assassin. The child "kills" all other players by winking at them. If you are winked at, silently count to 10, then put your feet in the middle of the circle. We always had a few drama queens who would act as if they really had been shot, and clutch their chest, and shake and scream
|
Fun Recipes Coca Cola Cupcakes IngredientsPart One• 1 cup coca cola or other cola drink Part two• 2 cups all purpose flour
Coca Cola Cupcake Recipe DirectionsPreheat oven to 325 degrees. Line cupcake pans with paper liners. These cupcakes work best with the silver metallic liners. Part oneIn a small saucepan mix cola, butter, vegetable oil and cocoa. Bring to a boil, remove from heat, and add marshmallows. Place lid on saucepan and leave until marshmallows begin to melt. Stir well. Part twoMix flour, sugar, and baking soda in a large mixing bowl. Add buttermilk, eggs, and vanilla. Mix well. Combine Part One and Part Two in the mixing bowl. Spoon cupcake batter into cupcake pan liners until they are 1/2 to 2/3 full. Bake at 325 degrees for approximately 20 minutes or until toothpick inserted in center comes out clean. Cool cupcakes completely before frosting with Coca Cola frosting. Chocolate Cupcakes
Ingredients• 2 cups all purpose flour Chocolate Cupcake Recipe DirectionsPreheat oven to 350 degrees. Line cupcake pans with paper liners. Combine all ingredients into large mixing bowl. Mix at low speed for 30 seconds, and scrape bowl. Mix at high speed for 3 minutes. Fill liners 1/2 to 2/3 full of batter. Bake 20 to 25 minutes or until toothpick inserted in center comes out clean. Cool 10 minutes in pans then remove from pan, and place on wire racks to cool completely. Frost when chocolate cupcakes are completely cool. Banana Walnut Cupcake Ingredientscupcake batter• 2 1/2 cups all purpose flour • 1 cup packed brown sugar • 1/2 cups sugar Preheat oven to 350 degrees. Line cupcake pans with paper or foil liners. Prepare cupcake topping by combining brown sugar, butter, and cream in a small saucepan over low heat. Stir constantly while heating. Remove from heat as soon as butter melts. Pour into bottom of liners, evenly dividing the topping mixture. Sprinkle walnuts on top of mixture. Prepare cupcake batter by creaming sugar and softened butter in a large mixing bowl. Scrape bowl and add mashed banana and vanilla. Mix for 1 minute on low speed. Add eggs 1 at a time, mixing on low speed for 30 seconds after each addition. In a separate bow, combine flour, baking powder, baking soda and salt. Stir well. Add half of flour mixture to egg mixture. Mix on low speed for one minute. Add remaining flour mixture and buttermilk. Mix at low speed until just mixed then high speed for 1 minute. Spoon cupcake batter over the topping in cupcake liners. Make sure the batter is even spread over the brown sugar walnut topping. The liners should be 1/2 to 2/3 full. Bake for 15-20 minutes or until a toothpick inserted in the center of cupcakes comes out clean. Cool cupcakes in pans for 3 minutes and then transfer to wire rack to cool completely. While cupcakes are baking, you should prepare the filling. Combine flour, sugar, and salt in a medium saucepan. Over medium heat, add milk slowly, stirring constantly. Continue stirring and heating until mixture starts to boil. Add approximately 1/4 cup hot mixture to the beaten egg in a separate bowl in order to temper the beaten egg and stir well. Continue stirring milk mixture constantly and add tempered egg to the mixture. Stir and continue cooking until mixture is bubbly. Remove from heat. Stir in vanilla and butter. Cool 15 minutes at room temperature then refrigerate for at least one hour. Once the filling and cupcakes are cool, you can assemble your Banana Walnut Torte Cupcakes on individual dessert plates. Carefully remove cupcakes from liners, and place walnut side up on plates. Cut cupcakes in half horizontally and set aside top half. Spread filling on bottom half of cupcake and top with thinly sliced bananas. Put a small amount of whipped cream on top of banana layer, and carefully replace top of cupcake. Top with remaining filling, bananas, and whipped cream. If you're feeling very creative, slice cupcakes so you have 3 cake layers. Top bottom with filling, bananas and whipped cream. Place next cake layer and repeat filling, bananas, and whipped cream. Place last cake layer carefully and top with whipped cream. ENJOY!!!! Red Velvet CupCake • 2 1/2 cups all purpose flour Combine flour, cocoa, baking powder, baking soda and salt in a mixing bowl. Sift dry ingredients three times. Cream together butter and sugar until light and fluffy. Add eggs one at a time, making sure to beat well after each egg. Add 1/4 of dry ingredients to creamed mixture then approximately 1/4 of buttermilk alternating until mixed well. Mix in vanilla and food coloring. Fill lined cupcake pans 1/2 full of red velvet batter. Bake in a preheated 350 degree oven for approximately 20 minutes or until a toothpick inserted in the center comes out clean. Cool cupcakes in pans for 5 to 10 minutes then remove from pans. Cool completely on wire racks before frosting. NOTE: If you don't happen to have buttermilk on hand you can try this simple substitution. Place one tablespoon of lemon juice or white vinegar in an empty one cup measuring cup. Fill with milk to 1 cup. Let stand for 5 minutes then use in any cake recipe that calls for buttermilk. Applesause CupCake • 1 cup whole wheat flour Combine all dry ingredients in a large mixing bowl. Add eggs, butter, and applesauce. Mix for 2 minutes at slow speed. Scrape bowl. Mix at medium speed for 1 minute. Scrape bowl, and stir in chopped apples and walnuts. Your oven should be preheated to 350 degrees. spoon cupcake batter into cupcake pans lined with paper or foil cupcake liners. You should fill each cup approximately 1/2 to 2/3 full making sure you have the same amount of batter in each cup. Bake your cupcakes for 15-20 minutes, or until a toothpick inserted into the center comes out clean. Remove the applesauce cupcakes from the pan, and cool completely on a wire rack. Top with caramel topping or frosting and enjoy! Blondies II 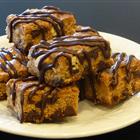 |
||
